In today’s digital world, more and more creators, entrepreneurs, and small business owners are turning to online platforms to sell their products. Whether it’s digital goods like eBooks, music, or design templates—or physical items like apparel and accessories—having a simple, all-in-one solution for selling online can make a huge difference. That’s where Sellfy comes in.
Sellfy is an easy-to-use eCommerce platform designed specifically for creators who want to sell digital and physical products, subscriptions, or even print-on-demand merchandise. Unlike more complex platforms that require multiple plugins, customizations, or third-party tools, Sellfy offers a clean, straightforward setup that allows you to launch your online store in minutes—with no technical experience needed.
But Sellfy isn’t just about ease of use. It’s packed with features that help you grow and manage your business. From customizable storefronts and built-in marketing tools to secure digital delivery and real-time analytics, Sellfy provides everything you need to start and scale your online store—all from one dashboard. You can even embed your Sellfy store into your existing website or share direct product links via social media.
Whether you’re a YouTuber selling exclusive content, an artist offering digital prints, or a small brand with a niche product line, Sellfy gives you the flexibility and tools to succeed. It’s ideal for anyone looking to avoid the complexity of traditional eCommerce platforms and get started quickly.
In this post, we’ll explore what makes Sellfy unique, how it compares to other platforms, and why it might be the perfect solution for your online business goals.
Step 1: Sign Up and Set Up Your Sellfy Account

Getting started with Sellfy is incredibly easy, even if you’re brand new to online selling. One of the best things about Sellfy is that it’s designed for beginners—no coding, no complicated setup, and no overwhelming options. Let’s walk through how to create your Sellfy account and get your online store up and running.
1. Visit Sellfy’s Website and Click “Start Free Trial”
To begin, head over to www.sellfy.com. On the homepage, you’ll notice a bright “Start free trial” button. Sellfy offers a 14-day free trial, which is perfect for exploring the platform and testing out its features without committing to a paid plan.
Click the button, and you’ll be taken to the sign-up page.
2. Create Your Account
You’ll be asked to enter some basic details:
- Your email address
- A password
- Your name or store name
You can also sign up quickly using your Google account if you prefer. Once you’ve filled in the required info, click “Create my store.”
That’s it—your store is now created!
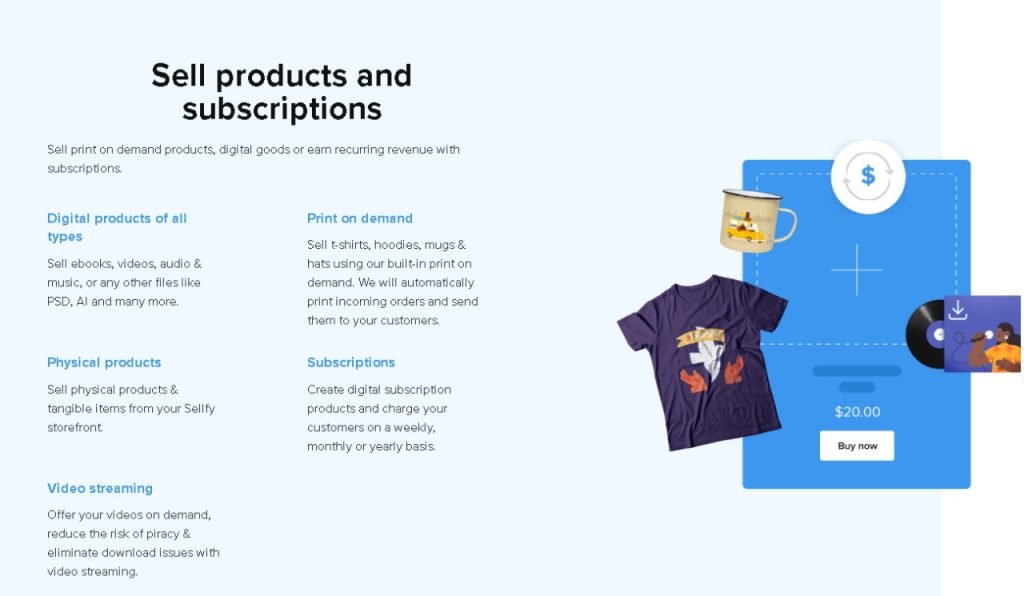
3. Choose What You Want to Sell
Next, Sellfy will ask you a few quick questions about what you plan to sell. You can choose from:
- Digital products (like eBooks, music, design files, videos, etc.)
- Physical products (like clothing, prints, handmade items, etc.)
- Subscriptions (great for memberships or premium content)
- Print-on-demand (Sellfy handles fulfillment and shipping)
- Freebies (helpful if you want to grow an email list or offer a sample)
This step helps Sellfy customize your dashboard for your business needs. Don’t worry—you can always change your options later.
4. Explore Your Dashboard
After you complete the initial setup, you’ll be taken to your Sellfy dashboard. This is your main control panel. From here, you can:
- Add new products
- Customize your store’s appearance
- Set up payment methods (like PayPal or Stripe)
- Access analytics and marketing tools
Spend a few minutes exploring the layout. Sellfy’s clean and user-friendly interface makes it easy to find everything you need.
5. Add Basic Store Info
Before launching your store, it’s a good idea to fill in some basic information:
- Your store name
- A short description of what you sell
- Your logo or banner image (optional but recommended)
These small touches help build trust with potential customers and make your store feel professional.
Next Step: Add Your First Product
Now that your Sellfy account is ready, you can move on to the fun part—adding your first product! In the next step, we’ll show you exactly how to upload, price, and publish your product so customers can start buying.
Step 2: Add Your First Product to Sellfy

Now that your Sellfy store is set up, it’s time to do the most exciting part—adding your first product! Whether you’re selling an eBook, artwork, physical merchandise, or even a subscription, Sellfy makes the process quick and easy. In this step, we’ll walk you through how to upload your product, write a great description, and get it ready for your first sale.
1. Go to the “Products” Tab in Your Dashboard
Start by logging into your Sellfy account. On the left-hand side of your dashboard, you’ll see a menu. Click on “Products.” Then click the green “Add new product” button. You’ll be given several product options:
- Digital Product – for files like eBooks, music, videos, or templates.
- Physical Product – for things you’ll ship yourself.
- Subscription – for ongoing memberships or premium content.
- Print-on-Demand – for custom apparel or accessories that Sellfy will fulfill and ship.
- Free Product – to offer freebies for email list building or promotions.
Select the type of product you want to upload.
2. Upload Your Product File or Info
If you’re selling a digital product, click “Upload file” and select the file from your computer. Sellfy supports a variety of file types—PDFs, ZIP files, MP3s, and more. You can upload multiple files if needed.
For physical products, you’ll enter information like weight, size, and variants (e.g., color or size options). You can also upload product images.
If you’re offering a subscription, you’ll define the billing interval (weekly, monthly, or yearly) and provide access details (such as links or file updates).
3. Write a Product Title and Description
Your product title should be clear and keyword-rich. Think about what your ideal customer might be searching for. For example:
“30-Day Meal Plan for Beginners | Printable PDF”
is more descriptive than just “Meal Plan.”
In the product description, explain exactly what the buyer is getting. Highlight the benefits, features, and what makes your product unique. Use bullet points if needed, and keep it beginner-friendly. Don’t forget to include any important details like file size, formats, or delivery instructions.
4. Set Your Price
Next, choose your pricing. Sellfy allows:
- Fixed prices (e.g., $10)
- Pay what you want (let buyers pay more if they wish)
- Free (great for lead magnets or samples)
If you’re selling digital products, you can also enable license keys or limit download attempts for extra control.
5. Add a Product Image or Preview
A good product image builds trust and increases sales. Upload a high-quality image that represents your product. For digital goods, you can create a mockup or screenshot. For physical items, use clean, well-lit photos.
6. Hit “Save Product”
Once everything looks good, click “Save product.” Your product is now live (unless you’ve marked it as hidden or scheduled). You can always go back and edit details later.
What’s Next?
Your first product is now in your Sellfy store—congrats! In the next step, we’ll show you how to customize your store’s appearance so it matches your brand and feels professional. You’ll also learn how to connect payment methods and make your store ready for customers.
Step 3: Customize Your Sellfy Store Design

Now that you’ve added your first product, it’s time to give your Sellfy store a personal touch. Think of your store like a digital storefront—it should reflect your style, personality, and brand. Whether you’re an artist, writer, coach, or small business owner, a clean and professional look can help you build trust and boost sales.
Don’t worry—Sellfy makes customization super simple, even if you have zero design or tech experience. In this step, we’ll walk through how to make your store visually appealing in just a few clicks.
1. Go to the Store Customizer
Start by logging into your Sellfy dashboard. On the left-hand menu, click on “Store Settings”, then choose “Store Customizer.”
This will take you to a live preview of your store, where you can change colors, layout, fonts, and images. You’ll see your changes in real time, so there’s no guesswork.
2. Choose a Layout That Fits Your Brand
Sellfy offers flexible layout options for your homepage. You can choose to:
- Highlight featured products
- Add a hero banner or welcome message
- Show categories or collections
- Include a short about section or testimonial
Choose a layout that fits your brand and product type. For example, if you’re selling a few high-ticket digital items, a clean, minimal layout with big images works great. If you have a variety of items, a grid-style product showcase might be better.
3. Customize Colors and Fonts
Next, update the colors and fonts to match your brand. You can choose a custom color for buttons, links, and backgrounds. Pick fonts that are easy to read and visually match your vibe—modern, elegant, playful, etc.
Don’t have a brand yet? No problem. Just choose colors that match your product style. For instance:
- Soft pastels for wellness or lifestyle
- Bold colors for digital art or music
- Neutrals for minimalist or professional looks
Tip: Use a free tool like Coolors or Canva Color Palette Generator to create a quick palette.
4. Add a Logo and Banner Image
Your store’s logo and header/banner image are important for building brand identity. If you don’t have a logo yet, you can use a text-based logo or create one using tools like Canva or Looka.
Upload your logo in the customization panel. Then, add a header image that tells your store’s story—this could be a product mockup, a lifestyle photo, or a simple design that introduces your brand.
5. Update Store Information and Navigation
Don’t forget to add your store name, tagline, and description. These show up on your homepage and help visitors understand what you’re offering.
You can also customize your store’s navigation menu. Add links to:
- Product categories
- Contact page
- About section
- External links (like your blog or social media)
Ready to Launch Your Look?
Once you’re happy with your design, click “Save” at the top. Your changes will be live immediately. You can come back and update your design anytime as your brand evolves.
What’s Next?
Your store now looks amazing and reflects your style—well done! In the next step, we’ll help you connect payment methods so you can start accepting money from customers around the world.
Step 4: Set Up Payment Methods and Start Accepting Payments

Now that your Sellfy store looks great and your first product is live, it’s time for one of the most important steps—getting paid. After all, the whole point of setting up an online store is to make money from your work!
Sellfy makes the payment setup process incredibly simple. Even if this is your first time selling online, you can connect your payment processor in just a few minutes. In this step, we’ll guide you through how to accept payments securely using trusted services like PayPal and Stripe.
1. Go to “Payment Settings”
Start by logging into your Sellfy dashboard. On the left-hand menu, click on “Settings”, then select “Payment settings.” This is where you’ll choose how you want to receive payments from customers.
You’ll see two main options:
- PayPal
- Stripe (Credit/Debit Cards)
You can activate one or both—many sellers use both to give customers more flexibility at checkout.
2. Connect a PayPal Account
PayPal is one of the most popular and widely trusted online payment systems. If you already have a PayPal account, you can link it to Sellfy in seconds.
- Click “Connect PayPal”
- Log in using your PayPal credentials
- Allow permission for Sellfy to connect
If you don’t have a PayPal account yet, you can quickly create one at paypal.com. Make sure you set it up as a business account—this allows you to accept payments and view transactions professionally.
Once connected, your customers will be able to pay directly using their PayPal accounts.
3. Set Up Stripe for Credit & Debit Cards
Stripe is another trusted platform that allows you to accept payments via Visa, MasterCard, American Express, and more. It’s perfect for people who prefer paying with credit or debit cards instead of PayPal.
Here’s how to connect Stripe:
- Click “Connect Stripe”
- You’ll be redirected to the Stripe website
- Log in or create a new account
- Follow the steps to authorize Sellfy
Stripe will ask for some basic business and banking info. This is so they can deposit your earnings directly into your account.
4. Test Your Checkout Process
Once you’ve connected your payment methods, go to your live store and test the checkout process. Try purchasing a low-cost product (or a free one if you set one up). This helps you make sure everything is working smoothly for your customers.
Check that:
- Payments go through without issues
- Confirmation emails are sent
- You receive a notification in your Sellfy dashboard
5. You’re Ready to Start Selling!
With payments set up, your store is now fully functional. You can officially accept orders from customers around the world!
What’s Next?
Now that you’re ready to make sales, it’s time to bring in traffic. In the next step, we’ll cover how to promote your store and drive traffic using social media, email marketing, and more.
Step 5: Promote Your Sellfy Store and Attract Your First Customers

You’ve set up your store, added products, customized your design, and connected payment methods—congrats! Now comes the fun (and sometimes challenging) part: getting people to visit your store and make a purchase.
It’s not enough to just launch your store and hope customers find you. You need to actively promote your products and build visibility. The good news? Sellfy has built-in tools to help, and you don’t need to be a marketing expert to get started.
Let’s look at a few simple and beginner-friendly ways to promote your Sellfy store and attract your first customers.
1. Share Your Store on Social Media
Start with what you already have: your social media profiles. Whether you’re on Instagram, Facebook, Twitter/X, TikTok, or Pinterest, these platforms are perfect for showcasing your products and driving traffic to your store.
Tips for beginners:
- Share product photos, behind-the-scenes content, or tutorials.
- Use relevant hashtags to reach new audiences.
- Add your store link to your bio or profile.
- Post consistently (but don’t overthink it—done is better than perfect).
If you’re not on social media yet, pick one platform to start with—ideally where your ideal customers hang out.
2. Use Sellfy’s Built-In Discount Codes
People love a good deal. With Sellfy, you can easily create discount codes or run a limited-time sale to encourage new customers to buy.
To create a discount:
- Go to your dashboard
- Click “Marketing”
- Choose “Discounts” and set the amount, duration, and code
You can offer a percentage off, fixed amount, or even a free product. Use this to drive urgency and reward early buyers.
3. Build an Email List (Even a Small One)
Sellfy includes simple email marketing tools that allow you to stay in touch with your customers or subscribers.
Even if you start with just a few people, sending updates, new product launches, or exclusive offers via email can drive sales over time.
Start by:
- Offering a free product or sample in exchange for an email
- Adding a sign-up form to your store
- Sending short, helpful emails on a regular basis
Your email list is a powerful asset—and it’s yours to keep.
4. Add a Link to Your Store Everywhere
Promoting your store isn’t just about ads or content. It’s also about visibility. Make sure your Sellfy store link appears:
- In your Instagram bio
- At the bottom of your email signature
- On your blog or website
- In YouTube video descriptions (if you have a channel)
The more places your link lives, the more likely people are to click and visit.
5. Use Word of Mouth
Don’t underestimate the power of your existing network. Tell your friends, family, and followers about your store. Ask them to share it if they like what you offer. Personal recommendations can go a long way, especially when you’re just starting out.
What’s Next?
You’re now on your way to building an audience and making your first sales. In the next step, we’ll talk about tracking your performance and understanding your store analytics, so you can see what’s working and improve your results over time.
Step 6: Track Your Performance with Sellfy Analytics

So, your store is live, your products are listed, and you’ve started promoting your shop. Amazing! But how do you know what’s actually working? That’s where Sellfy’s built-in analytics tools come in.
Tracking your performance is key to understanding your business. It helps you answer questions like:
- Which products are most popular?
- Where are my visitors coming from?
- How are people finding my store?
- What’s driving the most sales?
In this step, we’ll walk through how to use Sellfy analytics as a beginner so you can make smarter, data-backed decisions and grow your online business with confidence.
1. Access Your Analytics Dashboard
Once you log in to your Sellfy account, click on the “Analytics” tab in the left-hand menu. This section gives you a clear overview of how your store is performing—no complex data or spreadsheets required!
Here’s what you’ll see:
- Visitors
- Views
- Sales
- Conversion Rate
- Top Products
- Traffic Sources
Let’s break these down one by one.
2. Monitor Your Store Traffic
- Visitors: How many unique people are visiting your store.
- Views: How many total pages they looked at.
- Conversion Rate: What percentage of visitors made a purchase.
This helps you see if your promotions or social media posts are bringing in new potential customers—and whether those visitors are turning into buyers.
For example, if you had 100 visitors and 5 people bought something, your conversion rate would be 5%.
3. Check What’s Selling
Under “Top Products,” you’ll see which items are getting the most attention—and which ones are making you money. This is super helpful for planning future products or sales.
Ask yourself:
- Are digital or physical products selling better?
- Are people buying bundles more than single items?
- Which product pages get the most traffic?
This info helps you focus on what’s working.
4. See Where Your Traffic Is Coming From
Sellfy also shows traffic sources—like social media, email, direct links, or search engines. This tells you where your audience is discovering your store.
For example:
- If most traffic is from Instagram, you might double down on posting there.
- If you’re getting search engine traffic, maybe your product titles and descriptions are SEO-friendly—great job!
Knowing this helps you avoid guessing and spend your time where it counts.
5. Use Insights to Improve Your Strategy
Once you have some data, you can start making small improvements to grow your business. For example:
- If traffic is high but sales are low, try improving your product descriptions or adding customer reviews.
- If one product is selling well, consider promoting it more or creating a related item.
- If traffic is coming from a specific platform, focus your marketing efforts there.
What’s Next?
You’ve come a long way! Now you know how to track and understand your store’s performance, which is essential for long-term success. In the next step, we’ll explore how to scale your store with advanced features like upsells, embedding products on your website, and more.
Step 7: Scale Your Store with Advanced Sellfy Features
By now, you’ve done the heavy lifting—your store is live, your products are up, payments are connected, and you’ve started promoting and tracking results. You’re officially in business!
But you might be wondering: “What’s next?”
If you’re ready to grow beyond the basics and turn your store into a long-term income source, Sellfy has several powerful features that can help you scale. In this step, we’ll explore a few beginner-friendly tools inside Sellfy that can increase your sales, boost your customer experience, and expand your brand’s reach.
1. Offer Upsells and Related Products
Upselling is one of the easiest ways to increase the average order value. Sellfy allows you to offer product upsells—these are additional items shown to customers after they add something to their cart or during checkout.
For example:
- Selling a digital planner? Upsell a matching calendar template.
- Selling a T-shirt? Offer a matching tote bag or sticker.
To set this up:
- Go to your dashboard
- Click “Marketing” > “Upsells”
- Choose a product and add the item you want to offer as an upsell
This simple feature can make a big impact on your revenue—without extra advertising!
2. Embed Products or Store on Your Website or Blog
Already have a website, blog, or portfolio? You don’t have to send people away to make a purchase. With Sellfy, you can embed your products or even your entire store directly into your site.
This creates a seamless shopping experience and keeps visitors on your platform longer.
To embed:
- Go to your product page in the dashboard
- Click “Embed” and copy the code
- Paste it into your WordPress, Squarespace, or HTML-based site
You can embed:
- Buy buttons
- Product cards
- Full shopping cart
No coding skills required!
3. Create Subscription Products or Memberships
Want recurring income? Sellfy makes it easy to set up subscriptions for exclusive content, monthly product drops, or coaching services.
You choose:
- How often customers are charged (weekly, monthly, yearly)
- What they get access to
- Whether it’s digital downloads, access to a private email list, or even video courses
This is perfect for creators who want to build a community or steady income stream.
4. Use Email Marketing Automation
By now, you’ve probably collected a few email addresses. Sellfy allows you to send email campaigns directly from your dashboard—no extra tools needed.
You can:
- Send product updates
- Offer limited-time discounts
- Follow up after a customer makes a purchase
Email is still one of the best tools to build loyalty and repeat customers—and Sellfy gives you all the basics to do it well.
5. Expand with Print-on-Demand Products
Want to sell custom T-shirts, mugs, hoodies, or phone cases without holding inventory? Try Sellfy’s built-in Print-on-Demand feature.
You design the product, Sellfy handles printing and shipping. No upfront costs, no inventory headaches.
Wrapping Up: Your Online Store Journey
You’ve just completed a full walkthrough of launching and growing your own online store using Sellfy—from setup to scaling.
Remember, the key to long-term success is consistency: keep adding value, listening to your audience, and improving based on feedback and data.
Step 8: Build Customer Relationships & Keep Growing Your Store

You’ve done it! Your Sellfy store is up, your products are selling, and you’ve even started scaling with advanced tools. But here’s a secret that many beginners overlook: long-term success isn’t just about getting new customers—it’s about keeping the ones you already have.
Building real relationships with your audience is the key to consistent growth, loyal fans, and repeat sales. In this final step, we’ll explore simple, beginner-friendly ways to connect with your customers, deliver a great experience, and keep your store thriving.
1. Follow Up After Each Sale
A small gesture can make a big difference. After someone buys from your store, follow up with a thank-you email. It doesn’t need to be fancy—just a few kind words and maybe a helpful tip, bonus, or discount for next time.
Sellfy automates many of these messages for you, but you can also send personalized notes for extra impact. Showing appreciation makes customers feel valued and more likely to return.
2. Ask for Feedback and Reviews
One of the best ways to build trust (and improve your products) is to ask for customer feedback. Reviews also help new visitors feel confident about buying from your store.
Here’s how to start:
- Send a short email asking how their experience was
- Invite them to reply with a review or leave one on your product page
- Offer a small discount or bonus for leaving a testimonial
If they’re happy, you’ll get a great review. If something went wrong, you’ll have a chance to fix it—win-win.
3. Stay Active on Your Platforms
Consistency matters. Keep sharing content, updates, and behind-the-scenes moments on your social media, blog, or email list. You don’t need to post every day—just stay visible and engaged with your audience.[Sellfy online selling][Sellfy online selling][Sellfy online selling]
What to share:
- New product launches
- Limited-time offers
- User-generated content (like photos from customers!)
- Helpful tips related to your product niche
Even short, casual posts can keep people interested and connected to your brand.
4. Launch Seasonal or Limited-Edition Products
Keep things fresh by occasionally launching seasonal items, special editions, or limited-time bundles. These create excitement and urgency—and give loyal customers a reason to come back.
Examples:
- A holiday-themed product
- A summer-only discount bundle
- A digital “starter kit” for new customers
Sellfy makes it easy to schedule, hide, or publish products whenever you’re ready.
5. Keep Learning and Experimenting
The online world changes fast, so stay curious and open to trying new things. Maybe that’s testing a new marketing strategy, exploring influencer collaborations, or offering a new product type.
You don’t need to be perfect—just keep learning, improving, and showing up for your audience.[Sellfy online selling][Sellfy online selling][Sellfy online selling]
Your Store, Your Journey
Congratulations—you’ve made it through all 8 steps to launching, growing, and scaling your Sellfy store! Whether you’re selling digital downloads, physical items, or services, the skills you’ve built will serve you for years to come.
The journey doesn’t stop here—keep testing, learning, and engaging with your audience. You’ve got something valuable to share with the world. Now go out there and build the brand that only you can create!
Step 9: Stay Consistent & Keep Evolving Your Sellfy Store
You’ve made it through the first eight steps, and your Sellfy store is up and running—congrats! But success doesn’t stop with launching and getting your first few sales. Now, it’s time to focus on consistency, growth, and evolution.
Many beginners get excited at first, then slow down once the “new store” energy fades. That’s normal! The key to turning your Sellfy store into a reliable income stream is to keep showing up and improving over time. Step 9 is all about helping you stay consistent, continue learning, and set your store up for long-term success.
1. Set a Weekly or Monthly Routine
You don’t have to work on your store every day to grow it. But a simple routine will help you stay organized and consistent.
Here’s a sample monthly checklist:
- Add a new product or update an existing one
- Check your analytics and see what’s working
- Share at least one post on social media
- Send one email update to your customers
- Respond to customer messages or feedback
Even if you just do 2–3 of these regularly, your store will keep improving.[Sellfy online selling][Sellfy online selling][Sellfy online selling]
2. Keep Adding Value for Your Customers
Customers who love your products are more likely to return—so think of ways to keep surprising and delighting them. This could include:
- Creating helpful guides or tutorials related to your products
- Offering a monthly freebie for email subscribers
- Bundling items together at a special price
- Creating themed product drops (e.g., for holidays or seasons)
Adding value doesn’t always mean adding more—it just means giving your audience something meaningful and helpful.
3. Refresh Your Store’s Look Every Few Months
Just like a physical store might rearrange its displays, your online store should feel alive and updated. Every few months:
- Swap out banners or product images
- Highlight different featured products
- Update your product descriptions or pricing if needed
These small updates help keep your store fresh and engaging for repeat visitors.
4. Stay Inspired and Keep Learning
Selling online is a journey—and there’s always something new to learn. Follow a few eCommerce blogs, join creator communities, or watch Sellfy tutorials on YouTube to pick up fresh ideas.
Here are some areas you might explore over time:
- Better product photography or mockups
- SEO (search engine optimization) to get found on Google
- Collaborating with influencers or affiliates
- Testing paid ads (when you’re ready!)
The more you learn, the more tools you’ll have to grow.
5. Celebrate Small Wins
Growth doesn’t happen overnight—but it does happen with consistency. Whether it’s your first sale, your first review, or [Sellfy online selling][Sellfy online selling][Sellfy online selling]reaching 100 followers, take time to celebrate the small wins. These moments keep you motivated and excited to keep going.
You’re in It for the Long Game
Step 9 is your reminder that success is not a one-time event—it’s something you build week by week. Keep learning, keep creating, and keep serving your audience with passion. The more you show up, the more your store will grow.
Your Sellfy journey is just getting started.
Step 10: Reflect, Refine, and Reinvest in Your Sellfy Store
Congratulations—you’ve made it to Step 10, the final step in your journey to launching and growing a successful Sellfy store!
By now, you’ve set up your store, added products, learned how to promote, and explored advanced features. You’ve built momentum, connected with your customers, and stayed consistent. But here’s something important to remember: successful entrepreneurs never stop learning or evolving.
That’s what this final step is all about—reflection, refinement, and reinvestment. If you want your store to continue growing and serving your goals long-term, it’s time to look back, plan forward, and reinvest in yourself and your brand.
1. Reflect on What You’ve Accomplished
Take a moment to look at how far you’ve come.
- You built your own online store.
- You launched real products into the world.
- You made your first sales.
- You connected with customers.
That’s a huge deal—especially if you started as a complete beginner. Whether you’re still waiting for your first customer or you’ve had a few dozen sales, you’ve taken action—and that’s what sets you apart from the rest.[Sellfy online selling][Sellfy online selling][Sellfy online selling]
Write down your wins so far, big or small. This will motivate you during slow weeks and help you see your progress clearly.
2. Refine What’s Working (And Let Go of What’s Not)
Now’s the perfect time to take a closer look at your store’s performance and make a few smart adjustments. Here’s how:
- Look at your analytics: What are your most popular products? Which marketing channels bring the most traffic?
- Review customer feedback: What do people love? What could be improved?
- Assess your time: What tasks give you the best results, and which ones are draining you?
Keep doing more of what’s working, and don’t be afraid to let go of products, strategies, or tools that aren’t serving your goals.
3. Reinvest in Your Store and Your Skills
Once you start making sales, it’s tempting to just take the money and move on—but the best way to grow is to reinvest part of your profits back into your business.
Here are a few smart ways to reinvest:
- Upgrade your product visuals or mockups
- Invest in a tool that saves you time (like a Canva Pro account or a better camera)
- Take an online course to level up your marketing or design skills
- Hire a freelancer to help with tasks you’re not comfortable doing
Reinvestment helps you stay ahead, stand out, and serve your customers even better.
4. Set Your Next Goal
Even though this is the final step of the series, your journey doesn’t end here—it’s just the beginning. Set a new goal based on where you are now:
- Launch 5 new products
- Reach 100 email subscribers
- Hit $1,000 in sales
- Create a seasonal collection
No matter how big or small, having a goal keeps you focused and motivated.
Final Thoughts: You’re the CEO Now
You’ve gone from beginner to business owner. Whether you’re building a side hustle or growing your brand full-time, remember this:
Every big business started with one small step.
Stay consistent, keep showing up, and trust the process. Your Sellfy store is your platform, your brand, and your future—and you’ve got everything you need to keep moving forward.[Sellfy online selling][Sellfy online selling][Sellfy online selling]
So take a deep breath, celebrate your progress, and go chase your next big win.
You’ve got this.